In an
earlier post, I discussed how to take advantage of Pidgin's "saved status" feature. After seeing some recent confusion in #pidgin about our status features, I decided it would be a good idea to give a quick overview on how to take advantage of a feature I never use--creating statuses (including complex statuses) from the status selector on the buddy list window.
The status selector feels like it's been around forever. Prior to this, we had a rather horrible interface to "status" whereby you could either globally set all accounts to "away" or go to each individual account and configure a given status (away, do not disturb, vacation, etc.). All this was done via a single menu. For those of you who don't remember it, let me just say that it
sucked. Someone (I think it was Sean Egan) threw that whole UI out the window and came up with the current status selector that reminds me a lot of the old Windows ICQ 99 client that had a pretty similar status selector. Ours is a bit more sophisticated, though.
The simple use of the status selector is fairly obvious--pick a status and type a message. In fact, this is what the majority of our users do when they change statuses. This is what is called a transient status. What most people don't know, however, is that you can create complex statuses, such as having your MSN account set to "Busy" while your AIM account is set to "Invisible." Let's give a quick example.
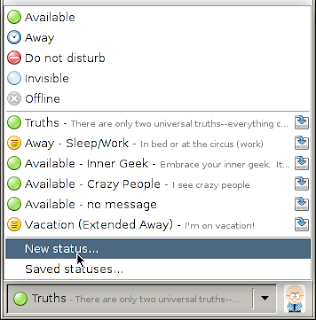
I have a number of accounts in Pidgin. Let's say I want to have my pidgin.im XMPP account set to "Available" but the rest of my accounts set to "Away" to create a simplistic scenario that's really easy for me to snag a screenshot of. To do this, I'll go to the status selector and select "New status..." like in this picture:

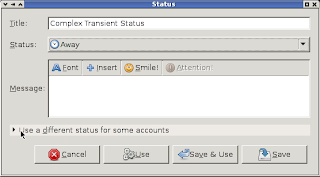
Then I'll see this window, where I've already gone and entered a title for the status. This is the name you'll see in the status selector and in the middle section of the status selector's menu. If I wanted a message to go with the away status, I'd enter it here now, as well.

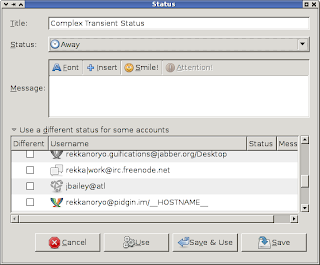
Since I want most of my accounts to be away, I'll leave the "Status" selection as "Away." As you can see, I have my mouse pointer over "Use a different status for some accounts," which when expanded will allow me to set statuses for individual accounts, like so:

I found my pidgin.im account in the list already, so I'll check the box in the "Different" collumn. That brings me to a new window:

Now I want my pidgin.im account to be available, so I'll accept what I see. If I wanted a message here, I'd type it in the "Message:" box. When I'm happy with what I have, I'll click OK. Notice that the "Status" column in the previous window changes to reflect what you selected for the individual account.
Since I'm happy with what I have, I'll now click "Use", which applies the status. If I wanted to make this a saved status that is saved permanently, I could click the "Save" button or the "Save & Use" button if I wanted to also immediately apply it when saving.
That's all there is to it!


